Check the accuracy of your Leica Lino laser levels regularly and particularly before important measuring tasks.
How to Check Accuracy for Leveling
Set the instrument on a tripod halfway between two walls (A+B) that are approximately 5 m apart. Place the Lock switch 3 in the "Unlocked" position. Direct the instrument at wall A and switch on the instrument. Activate the horizontal laser line or laser dot and mark the position of the line or the dot on wall A (-> A1).

Rotate the instrument by 180° and mark the horizontal laser line or the laser dot in exactly the same way on wall B (-> B1). Then place the instrument at the same height as close as possible to wall A and again mark the horizontal laser line or the laser dot on wall A (-> A2) . Rotate the instrument by 180° again and mark the laser on wall B (-> B2). Measure the distances of the marked points A1-A2 and B1-B2. Calculate the difference of the two measurements. If the difference does not exceed 2mm, then the Leica Lino is within tolerance. | (A1 - A2) - (B1 - B2) | ≤ 2 mm
Checking the accuracy of the horizontal line (only Lino L2, L2+, L2G+, L2P5 and L360):

Place the Lock switch 3 in the "Unlocked" position. Position the instrument approximately 5m away from the wall. Direct the instrument at the wall and switch on with the LASER key 1. Activate the laser line with the LASER key 1 and mark the intersection point of laser crosshairs on the wall. Swivel the instrument to the right and then to the left. Observe the vertical deviation of the horizontal line from the marking. If the difference does not exceed 3mm, then the Leica Lino is within tolerance.
Checking the accuracy of the vertical line (only Lino L2, L2+, L2G+, L2P5 and L360):
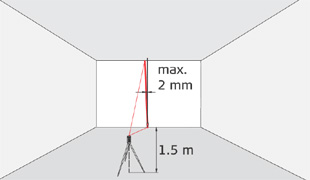
Place the Lock switch 3 in the "Unlocked" position. As reference, use a plumb-bob and attach it as close as possible to an approximately 3 m high wall. Position the instrument at a distance of approximately 1.5m from the wall at an elevation of approximately 1.5m. Direct the instrument at the wall and switch on with the LASER key 1. Activate the laser line with the LASER key 1. Rotate the instrument and align it with the bottom of the plumb line. Now read off the maximum deviation of the laser line from the top of the plumb line. If the difference does not exceed 3 mm, then the Leica Lino is within tolerance.
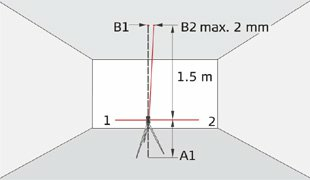
Checking the accuracy of the vertical plumbing (only Lino P3, Lino P5 and Lino L2P5):
Place the Lock switch 3 in the "Unlocked" position.
Checking the upper plumbing point:
Checking the lower plumbing point:
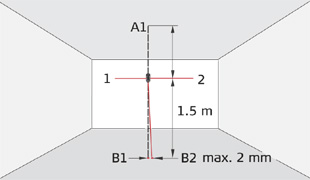
Set up the laser on its tripod or wall mount bracket near point A1 at a minimum distance of 1.5 m from point B1. The horizontal laser is aligned in direction 1. Mark the laser dots A1 and B1 with a pin. Rotate the instrument by 180° so that it points in the opposite direction 2 to direction 1. Adjust the instrument so that the laser beam hits point A1 exactly. If point B2 is no further than 2 mm away from point B1, then the Leica Lino is within tolerance.
Should your Leica Lino laser level be outside of the specified tolerance, please contact an authorised dealer or Leica Geosystems support.